

Best Kitchen Products for Cooking Microgreens
Cooking microgreens or cooking with microgreens doesn’t require sophisticated kitchen equipment.
But some specialized tools make cooking with microgreens a whole lot easier.
Here are the five things I recommend everyone using microgreens have in the kitchen.
Whether you are tossing a salad, boiling a soup or stew, juicing, making a sandwich, brewing tea, making an omelet, or baking a pizza:
- These pair of kitchen shears on Amazon.com. This is a useful tool, from cutting microgreens and vegetables to opening food packaging. They are my Swiss Army knife of the kitchen.
- This juicer on Amazon.com. A well-made juice is smooth and uniformly consistent. This model gives you fresh, healing enzymes from your raw fruits, vegetables, and microgreens.
- This electric dehydrator on Amazon.com. Fresh microgreens last about 5-7 days refrigerated. With a dehydrator, you can keep your microgreens for over 90 days with dehydration. This beauty is a space saver when kitchen real estate is limited.
- This glass teapot on Amazon. Who doesn’t love a good cup of tea? And there is no better cup of green tea than microgreens. This pot also comes with a tea infuser to let you brew your own combinations.
- This cast-iron pot set on Amazon.com. And no kitchen is complete without one. This unit is a 2-in-1 skillet and pot. It is a bargain for cooking microgreens, omelets, soups, and stews.
Kitchen Shears
The kitchen shears I recommend for any kitchen are the Shun Kitchen Shears.

It is a professional-grade shear with 4” blades in an overall length of 9” that come apart for easy cleaning and sharpening.
If you’re looking to cut bigger things, like meat, then you might consider something more considerable.
I find the design works well for most things in the kitchen.
Oh, and make sure you get shears, not scissors.
Both have two blades and handles.
Shear, however, has longer blades (6” or more) and various size handles for more leverage when cutting.
I bought a cheap pair of kitchen scissors at the local mart near the house.
I think I got about 10 cuts on some carrots before the center rivet popped out.
Almost hurt me.
Made from composite VG-10 super steel, they give a precise and crisp cut using a micro-serrated edge.
And I love the sizeable D-shaped bottom handle made of rubber for comfort and safety
You can go cheaper, and you can go big, but these Shun Kitchen Shears will last you 10 years if you take care of them
Juicer
I have gone through about five or six juicers in the past 15 years.
But the juicer I recommend and use myself is the Hurom Two-Tone Blue H400 Award Winning Cold Press Juicer Machine.

There are juicers costing $2,500 and juicers costing $45.
And yes, the price does matter.
The best juicers out there are what’s called two-step juicers, like the Norwalk Juicer ($2,495). This method avoids the heat generated by the electric motors, which can damage enzymes in the fruit juice. A masticating juicer is an acceptable alternative, as it extracts enough juice and preserves enzyme activity.
The Hurom Two-Tone Blue H400 Award Winning Cold Press Juicer Machine is the one for me.
It fits with my nickel kitchen and other black appliances.
If you have a house with a white kitchen, which is the latest trend, you can still get it.
I would avoid centrifugal juicers.
The centrifugal force subjects the juice to heat and oxygen, killing off its essential healing enzymes.
And they don’t juice leafy greens and microgreens very well.
Blenders, such as the Vita-Mix and the Blendtec, are not juicers.
They make smoothies rather than juices.
To get the nutrients of one 8oz glass of beet microgreen juice, for example, you’d need to eat 6 pounds of beets to achieve that!
Okay, I just tossed out my Jack LaLanne Power Juicer that I bought in 2014.
If you want to learn more about juicing microgreens visit my post, “Can You Juice Microgreens?”
Food Dehydrator
The Brod & Taylor SAHARA Folding Food Dehydrator is my choice when drying my microgreens.

In my post, “How Long Can You Store Microgreens,” you will learn that at 4oC (39oF), the temperature your fridge should be at, the shelf life of most microgreens is between 7 and 10 days.
We rarely eat what we harvest in one sitting.
And I’m sure you don’t use microgreens every day.
So, I decided to try dehydrating my microgreens.
I was worried I’d lose too many nutrients from the heat.
Nope.
Read my post, “Can Microgreens Be Dehydrated?” to learn more.
So, why this Brod & Taylor SAHARA Folding Food Dehydrator, you ask?
The unit folds to one-third of its size.
Yep! That means you can tuck it away when you’re done making your latest batch of dried microgreens fruits, vegetables, herbs, or yes, meats too.
And it has dual 700-watt heaters, automated temperature controls, and a washable, reusable air filter that prevents smells and tastes from contaminating your dried foods.
It isn’t a budget buy.
But unless you live in a house with more than 3000 square feet (300 square meters), it will be hard to find a kitchen with lots of countertops.
Glass Tea Pot
The teapot I recommend for the house is the VAHDAM Radiance, Glass Tea Pot with Infuser.
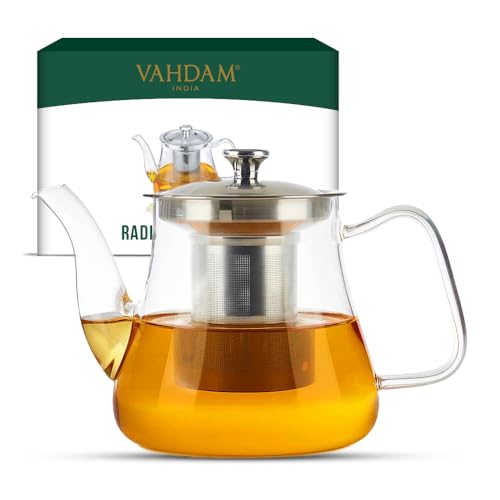
It is made with lead-free, non-BPA, heat-resistant Borosilicate Glass that you can even use in your oven or microwave.
I like it because I can mix my dried nasturtium microgreens with a little bit of dried ginger in the industrial-grade stainless steel infuser.
The infuser has an ultra-fine mesh that prevents debris from falling into the teacup.
I can get about 3-4 cups in one steeping from a drip-free stout.
This Radiance Glass Teapot is a very versatile addition to any teaware collection.
Cast-Iron Pot
These pans can do anything.
They are indestructible and require minimal cleaning.
They remind me of my grand aunt’s kitchen.
The Cuisinel Pre-Seasoned Cast Iron 2-In-1 Multi-Cooker – 3-Quart Dutch Oven and Skillet Lid Set is a great buy.

The cast iron is seasoned (more on that later), increasing durability and providing even heat distribution.
It is oven-ready with 450oF heat-resistant knobs and handles.
I wouldn’t recommend putting them in your dishwasher. Not that you’d want to do that with these cast-iron pots, anyway.
So seasoning is a process to preserve your pots.
Most manufacturers heat the pots to about 200oF, rub flaxseed oil in the pot and then place the pot upside down in a 500oF oven.
Good pots get this done 4-to-6 times before they reach you.
I cook my soups and quiches in this Cuisinel Cast-Iron pot.
The 2-in-1 feature comes in handy as the skillet doubles as the pot cover.
Please don’t use scrub pads or steel wool to clean these pots.
Plain soap and water with a sponge will do the trick.


