It was Stephen who first put microgreens in front of me. At his wife’s 50th birthday dinner in Atlanta, the server set down a colorful salad I didn’t recognize.
“They’re microgreens,” Stephen said.
I picked up a few of the tiny stems and bit in. Sweet, a little spicy, with a peppery aroma. He spent the next five minutes telling me what they were and why he ate them.
Today, Stephen runs JPure Farms, and I publish Microgreens World, and the question people ask us most is how to grow microgreens at home. So here is my best method from the farm.
You don’t need a garden or much space. A windowsill and about ten minutes a day take you from seed to harvest in roughly ten days, and this guide walks you through every step.
Key Takeaways
Microgreens are the young seedlings of edible vegetables and herbs, harvested at one to three inches tall about seven to fourteen days after sowing. Brassica-family microgreens like arugula, radish, and red cabbage carry the highest antioxidant capacity of the species tested (Kyriacou et al., 2018). You can grow microgreens at home on a sunny windowsill.
Read on below: what microgreens actually are, the short list of gear you need, which varieties to start with, and the full day-by-day cycle from seed to harvest.

Back to that first bite. The stems I picked up were a mix of arugula and radish microgreens from a local farm, and once Stephen explained what they were, I was hooked. So what are microgreens, exactly?
A microgreen is the young seedling of an edible vegetable or herb, grown past the sprout stage and harvested when it is just a couple of inches tall. That is it. The same seeds that grow full mature plants grow microgreens. You just harvest them early, when the flavor and color are at their peak.
Most of what I share here comes straight from the farm, from years of growing, testing, and getting it wrong before getting it right. Some of it started as expert advice I wrote for Porch, a home-services company involved with roughly two out of every three U.S. homebuyers each month. You can read that piece, Indoor Gardening: Expert’s Advice, for the short version.
Children of the soil
Think of sprouts, which are seeds germinated in water, as babies. Microgreens are the next stage: the stem and first leaves of the plant. I think of them as the children of the soil.
They look like little green two-leaf clovers. Those are the embryonic leaves that appear once the seed pops out of the ground. They start out white, then turn green as light triggers chlorophyll production.
The best part is how many plants you can grow this way. Herbs, root vegetables, edible flowers, and a whole range of flavorful greens all work.
Cotyledons and microgreens
Next time you have a raw peanut or bean in hand, peel the coat and split the seed in two. Inside, you will see two tiny leaves. Those are embryonic leaves, and the seed skin around them is called a cotyledon. According to the Encyclopedia Britannica, a cotyledon is the “seed leaf within the embryo of a seed.”
You probably learned this in fourth grade. If you are like me, you forgot.

Cotyledons are the first plant parts to break the soil. They look like fat little leaves, and they feed the seedling through photosynthesis until it can make its own food. Direct sunlight gives you the most succulent growth, though indirect light will do. They look nothing like the next stage, the “true leaves.”
Microgreens look like clovers
The true leaves show up in the second phase of growth. They push out between the cotyledons about 2 to 3 days after germination. Four to five days after that, at 2 to 4 inches tall, your microgreens are ready to harvest.
Do not let them get much taller than that, or they start to lose their sweetness. This brief video from the University of Illinois Extension Service shows the difference between cotyledons and true leaves.
So when can you grow them, and where?
Windowsill gardening
You can grow microgreens at home, and even at work. Inside or outside, on a windowsill, in the kitchen, or out in the garden. All you really need is a small space near a window or a protected spot on the porch.
Sunlight helps, but indoor light works too, and indirect light on a cloudy day is often enough. You can grow them in recycled clamshells, plastic containers, or old flowerpots, as long as they have drainage holes.
The best thing about growing your own is that it runs year-round. It can be snowing outside, or you can be in the middle of the desert, and you can still have fresh greens on the counter.
How do you start growing microgreens?
Starting is a lot like cooking from a recipe. You decide how many servings you want, you gather your equipment, you pick your ingredients, and then you follow the steps. Plan on about an hour of prep the first time, then roughly ten minutes a day after that.
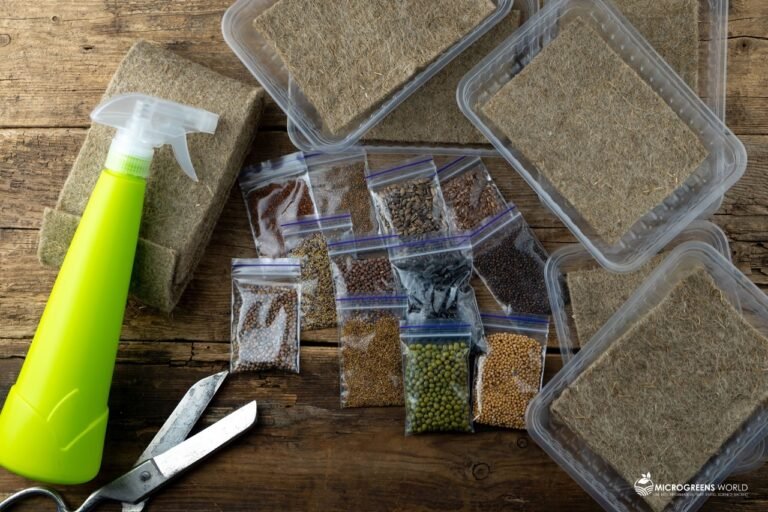
Here is the gear side of things. None of it is fancy, and you probably have half of it already.
When you grow microgreens at home, this is the short equipment list:
| Container | Almost anything works, as long as it holds soil and drains. You can even grow on eggshells. |
| Trays or Flats | For a bigger harvest, the industry standard is a 10x10x2 inch tray with holes in the bottom. |
| Soil scoop or small shovel | To fill your container without a mess. |
| Bed rake | A small rake to level the soil so seeds sit evenly. Even seeding matters more than it sounds. |
| LED LIghts | Nothing special. A simple LED runs 14 to 16 hours a day for strong growth. A timer is optional but handy. |
| Two Misting bottles | One for the seed bed, one for the seedlings after they sprout. Amazon. |
| Kitchen Shears or Scissors | A clean, sharp cut at harvest beats hacking at the greens with a dull blade. |
A few optional extras can make life easier once you get going: a fan for airflow, a small scale, a measuring spoon, a temperature and humidity meter, and a spice shaker for even seeding. None is required to grow a good first tray.
What do you need to grow microgreens at home?
You have the gear. Now the inputs. To grow microgreens at home, you really need just four things in the tray, and the first one matters most.

| Soil | The better the soil, the healthier your microgreens. Skip heavy potting or garden soil and use a light potting mix, container mix, or seed-starting mix instead. Poorly chosen soil is behind a lot of beginner headaches: mold, patchy growth, and trays that never quite fill in. |
| Seeds | You can get everything else right and still fall short here. As my buddy Stephen likes to say, if you do not start with good seeds, expect nothing but bad microgreens. The same seeds that grow mature herbs and vegetables grow their microgreen versions, so avoid chemically treated seed and look for a Certified Naturally Grown or certified organic label. For more, see how to pick the best seeds to grow microgreens. |
| Distilled Water | Water is at the heart of growing microgreens. When you grow in soil, distilled water is all you need. It is the purest form available, with both contaminants and minerals removed, so nothing in the water works against your young seedlings. |
| Food-Grade Hydrogen Peroxide | Keep a bottle of food-grade H2O2 on hand. This pale blue liquid works as an oxidizer, a cleaner, and a seed sanitizer, and it comes in handy at a few points in the grow. |
If you think I left something off, the Microgreens World Resource Page has more ideas. Otherwise, you are almost ready to plant. First, you need to choose what to grow, and the next section makes that call easy.
Which microgreens should you grow first?
With over 100 edible plants you can grow as microgreens, the choice can stall a beginner before they start. So let me make it simple. Before you grow microgreens at home, run each option through five quick criteria: the plant family, how fast it grows, how it tastes, what nutrients it carries, and how well it keeps in the fridge.
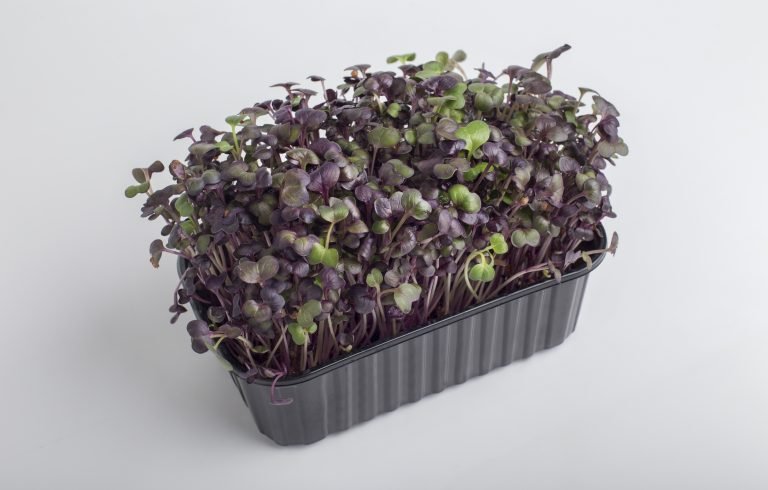
Start with the Brassicaceae, or mustard, family. These are the most studied microgreens, and for good reason. Brassica microgreens like arugula, broccoli, kale, radish, and red cabbage carry the highest antioxidant capacity of the species researchers have tested (Kyriacou et al., 2018), along with notable carotenoids, vitamins, and minerals.
Microgreens that grow fast
There is a reason these five are among the most grown in the world. They have some of the shortest cycles, roughly 7 to 10 days from seed to harvest, with a few exceptions. Fast cycles mean you can grow more often and waste less.
Microgreens that fit your taste
Do you want sweet, nutty, or peppery? Arugula is savory and nutty without being bitter, with a strong aroma. Red cabbage is sweeter and milder than the mature vegetable. Radish brings a sweet, peppery bite with real punch.
Microgreens that are rich in nutrients
The brassica family owes much of its reputation to glucosinolates, sulfur compounds found across these plants in amounts that vary by species and growth stage. When the plant tissue is broken, glucosinolates form isothiocyanates such as sulforaphane. In cell and animal studies, researchers have investigated these compounds for how they activate the body’s Nrf2 antioxidant pathway (Yang et al., 2015). Most human research so far has used broccoli sprout preparations rather than microgreens specifically, so the microgreen data is still catching up.
Individual varieties bring their own strengths. Arugula is high in potassium, a mineral your body uses to regulate muscle contractions and nerve signals. Red cabbage is rich in lutein and zeaxanthin, two carotenoids that concentrate in the macula of the eye, where research has examined their role in protecting against age-related macular degeneration (Bernstein et al., 2016).
Microgreens that keep well
Microgreens are not built for long storage, but good shelf life means you plant less often. Storage temperature is the biggest lever. In one study, mustard microgreens held their quality for about 14 days at 5°C but broke down within a single day at room temperature (Dayarathna et al., 2023). Cold is doing the heavy lifting (Turner et al., 2020).
So keep your harvest in an airtight container on the bottom shelf, the coldest part of the fridge, ideally between 35 and 40°F. Do not freeze them.
So which should you grow first?
If you want me to just pick, start with arugula and red cabbage. Red cabbage grows fast, keeps well, and has an earthy, peppery flavor I like. Arugula grows just as fast, holds up well in the fridge, and carries that nutty, not-bitter taste. It also happens to be one of the oldest domesticated plants, and it is forgiving to grow.
If neither appeals to you, green cabbage, watercress, red radish, or wasabi are all excellent starting points. Just follow the steps carefully.
Microgreens to avoid
A few common crops are not safe at the seedling stage. Tomato, pepper, eggplant, and potato all belong to the nightshade family and carry alkaloids that are toxic when the plant is young. Stay away from wild plants too, unless you are an expert, including wild chicory and common dandelion.
With your variety chosen, Day 0 is finally here. Time to plant.
How do you grow microgreens step by step?

Here is the whole cycle, day by day. From sowing to harvest runs about ten days, and most days ask only a few minutes of you. This is the part where you actually grow microgreens at home, start to finish.
Day 0: Prepare, sow, water. Prepare the seedbed, sow your seeds evenly, and water the bed. Whether your seeds are store-bought or lying around like mine were, sterilize your equipment in boiling water first. (Skip the boiling water on plastics.)
Day 1: Germination. Check that the bed has enough moisture and the right temperature. You are watching for the first sprouts, and keeping an eye on light, water, heat, humidity, and early disease control.
Day 2: Seedlings. The seeds have germinated. Set up your watering tray and your light sources, both natural and artificial. It took me two days to learn that 6 to 8 hours of light was not enough. Seedlings want more than 12 hours a day.
Days 3 to 8: Monitor and manage. This is the stretch where you keep conditions steady. Water, air, and light are the three levers, so let me break each one down.
Water
Water is at the center of plant growth. It moves sideways toward the root hairs and up from below as the plant demands more, whether from growth or from evaporation. Your job is to keep the bed evenly moist, never soggy.
Air
Airflow and temperature go together. Aim for a temperature between 68 and 85°F (20 to 30°C) to encourage germination, and keep gentle air moving so moisture does not sit. Still, damp air is where most tray problems begin.
Light
I use LED lights to grow my microgreens at home, and that is what I recommend to you. They are easy to run and easy on the budget. Microgreens need roughly 100 to 300 PPFD to germinate and about 200 to 600 PPFD to grow to harvest.
Plants lean on red and blue light and use very little of the yellow and green in sunlight. I have a name for the mix you want: “burple.” Microgreens grow best with blue and red light running the whole time. If you plan to grow commercially, you can fine-tune the spectrum for each stage.
What if my tray grows mold?
Mold is the problem new growers hit most, and it almost always comes down to the same thing: too much water and not enough air. If you see fuzzy white or gray patches, ease off the watering and get more air moving across the tray right away. That first move alone saves a lot of trays.
Mold can take a whole tray overnight, though, and telling harmless root fuzz from real mold is where most people get stuck. The full walk-through, how to tell them apart, and how to recover a tray that has started to turn, is in the book.

Day 9: Harvest. Cut, wash, clean, and dry your microgreens, then enjoy the meal you grew. Four simple steps close it out: cutting, washing and cleaning, drying, and eating your harvest.
Wrap-up: growing microgreens at home
You now have the whole picture: what a microgreen is, the gear you need, which varieties to start with, and the day-by-day cycle from seed to harvest. Arugula or red cabbage, a sunny windowsill, and about ten minutes a day are all it takes to get your first tray going.
So if you have not started yet, that is the only real next step. Find a little time, get some good seeds, and grow them. It is a fun way to add fresh flavor and nutrition to your meals, and an easy one to get the family involved in.
This guide is one piece of a larger picture. Once your first tray works, you will want to branch into new varieties and dial in your setup, and the growing microgreens hub is where all of that lives.
This information is educational and is not a substitute for professional medical advice. Talk with your physician before making significant changes to your diet or before using microgreens to address a health concern.
Growing microgreens at home: frequently asked questions
How do you prepare and eat microgreens?
Microgreens are ready to eat raw, straight after you rinse and dry them, with no cooking required. Snip what you need and add it at the end. They work on salads, sandwiches, eggs, toast, soups, and bowls, adding just before serving so they keep their texture and flavor.
How long do microgreens take to grow?
Most microgreens are ready to harvest in about seven to fourteen days, depending on the variety. The fast brassicas like arugula, radish, and red cabbage sit at the short end, roughly seven to ten days from sowing. You harvest once the first true leaves appear and the greens reach two to four inches.
Can you grow microgreens without soil?
Yes, many growers use a soilless setup with a growing mat or pad instead of a soil mix. It keeps the harvest cleaner and the trays tidier, though soil still tends to give strong, sturdy growth for a beginner. Either way, the light, water, and airflow basics are the same.
Are microgreens the same as sprouts?
No, they are different. Sprouts are seeds germinated in water and eaten whole, roots and all, after a few days. Microgreens grow longer in soil or on a mat, and you harvest just the stem and leaves with scissors. Microgreens also need light to grow, while sprouts do not.
Are microgreens good for you?
Microgreens are nutrient-dense young greens, and brassica varieties in particular carry high antioxidant capacity in research testing. They are a simple way to add vegetables, color, and flavor to everyday meals. As with any food, they work best as part of a varied diet rather than on their own.
Do microgreens grow back after you cut them?
Most microgreens do not reliably grow back after harvest, so you start a fresh tray each time. A few, like peas, can push out a smaller second cutting, but the first harvest is always the best one. Planning a new tray every week or two keeps a steady supply on hand.
References
Bernstein, P. S., Li, B., Vachali, P. P., Gorusupudi, A., Shyam, R., Henriksen, B. S., & Nolan, J. M. (2016). Lutein, zeaxanthin, and meso-zeaxanthin: The basic and clinical science underlying carotenoid-based nutritional interventions against ocular disease. Progress in Retinal and Eye Research, 50, 34-66. https://doi.org/10.1016/j.preteyeres.2015.10.003
Dayarathna, N. N., Gama-Arachchige, N. S., Damunupola, J. W., Xiao, Z., Gamage, A., Merah, O., & Madhujith, T. (2023). Effect of storage temperature on storage life and sensory attributes of packaged mustard microgreens. Life, 13(2), 393. https://doi.org/10.3390/life13020393
Kyriacou, M. C., El-Nakhel, C., Graziani, G., Pannico, A., Soteriou, G. A., Giordano, M., Ritieni, A., De Pascale, S., & Rouphael, Y. (2018). Functional quality in novel food sources: Genotypic variation in the nutritive and phytochemical composition of thirteen microgreens species. Food Chemistry, 277, 107-118. https://doi.org/10.1016/j.foodchem.2018.10.098
Turner, E. R., Luo, Y., & Buchanan, R. L. (2020). Microgreen nutrition, food safety, and shelf life: A review. Journal of Food Science, 85(4), 870-882. https://doi.org/10.1111/1750-3841.15049
Yang, L., Palliyaguru, D. L., & Kensler, T. W. (2015). Frugal chemoprevention: Targeting Nrf2 with foods rich in sulforaphane. Seminars in Oncology, 43(1), 146-153. https://doi.org/10.1053/j.seminoncol.2015.09.013