

Yesterday I was sharing some tips about growing microgreens with my in-laws.
They had just read a copy of my book, “The Easy Guide: Growing Microgreens at Home.”
If you haven’t gotten your copy yet, go HERE.
I told my in-laws that growing microgreens at home, or for profit, requires some simple tools to start.
But some specialized tools make growing microgreens a whole lot easier.
Here are the 10 best tools I recommend everyone growing microgreens have in the kitchen drawer, cupboard, or garden toolshed:
- These growing containers are on Amazon.com. These efficient but straightforward planting pots are perfect for starting out growing microgreens. They look beautiful too on your windowsill.
- This misting bottle (click to check the price on Amazon). Multipurpose, you can use it for your indoor and outdoor plants. This misting tool is easier and more accurate than cheap hand-spray bottles.
- This is food-grade hydrogen peroxide (click to check the price on Amazon). Neither your kitchen nor your garden should be without H2O2. This pale blue liquid is an oxidizer, cleaner, and purifier.
- This LED grow light is on Amazon.com. Simple, elegant, efficient. This small full-spectrum grow light is ideal for growing microgreens indoors at home. It brings photosynthesis when you don’t have the sun.
- This 24-hour plug-in timer is on Amazon.com. This simple programmable timer works excellently with your grow light. No more getting up to check lights in the middle of the night.
- This garden toolset with a mini rake on Amazon.com. These small wooden handled garden tools are built to last. You can use them to loosen and level your soil before planting.
- This small fan (click to check the price on Amazon). Small, quiet, and stable this mini fan is great for rooms or areas where the air may be dry or musty. It works great when you’re cooking microgreens too.
- This temperature and humidity meter is on Amazon.com. Growing below ground or in potentially humid conditions? This neat humidity meter lets you know when to turn on the fan. And, it works great if you have a wine cellar too.
- This humidity dome and seed starter are on Amazon.com. These seed starter kits come with humidity domes if you have humidity problems. Great for starting on your microgreens growing journey.
- These spice shakers (click to check the price on Amazon). Those of us with “not so steady hands” can load this shaker with seeds to get an even spread.
Best Garden Products for Growing Microgreens
You don’t have to spend a fortune to have your indoor or outdoor microgreens garden.
These microgreens growing tools are the best ones I use or can recommend.
Growing Containers
You will need trays to put your growing soil in.
The best type of trays to buy for microgreen growing are containers that have holes in the bottom.
You want to water the plants from the bottom. See my book, The Easy Guide: Growing Microgreens at Home, to learn more.
The growing containers I recommend if you’re growing microgreens at home are these beautiful retro-style SOLIGT Extra Thick Heavy Duty 10 Pack Seed Starting Trays (click to see them on Amazon).

These 10×20 trays are made of robust and reusable plastic and will last a long time.
The grid bottom allows for good drainage, so you can use them to grow other small plants as well.
I like these pots not only because of their beautiful mocha color but that they are functional.
Hint: The stand substitutes as a cover during the first two days of microgreens germination.
You could buy plain plastic trays.
But these beauties can go anywhere in the home
And you can use them over and over.
Misting bottle
You will need a misting bottle to spray water on your seedlings after you sow them.
A misting bottle is only used in the germination stage.
Afterward, you will water them from the bottom (or only water the soil).
There are two types of misting bottles.
- You press the handle every time you spray.
- You build up pressure in the bottle with a pump.
The Ram-Pro Mister (click to check the price on Amazon) is my go-to tool.
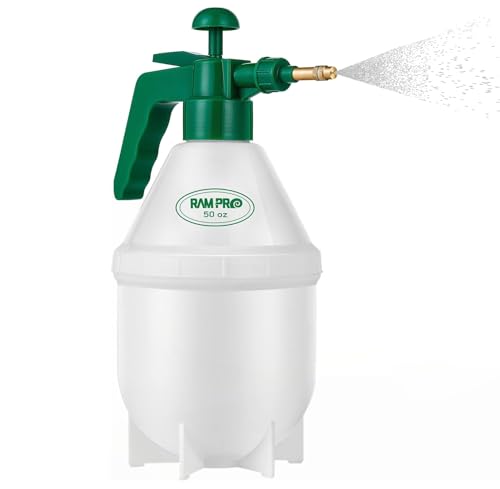
It holds 1.5 liters (about 50 ounces).
It has a thumb spray button with a brass nozzle.
It took me a few times to get the pressure up.
So, I’d recommend you fill it up at least halfway.
Then, pump and spray.
You can also use it for small watering plants in your indoor or outdoor garden.
When you water your seeds with a hose or cup, the seeds will start to float, which will disrupt them.
That’s why you need to use the Ram-Pro Mister.
It’s easy, and there’s no water mess.
Food-grade Hydrogen Peroxide
Hydrogen peroxide (H2O2) is one of the best natural cleaners, disinfectants, and purifiers.
However, food-grade H2O2 is not to be consumed directly.
You want to spray the seeds and the soil to kill any harmful bacteria.
The Essential Oxygen Food Grade Hydrogen Peroxide 3% (click to check the price on Amazon) is what I use to prepare my soil and wash my seeds before planting.

The 32-ounce bottle also comes with a convenient 8-ounce spray bottle.
I like it because it’s free of toxic stabilizers found you find in the brown bottle of peroxide sold at your local pharmacy or apothecary.
It’s safe and won’t burn you like some of the store brands.
And we use the Essential Oxygen H2O2 all the time to clean cutting boards and add to laundry.
We even use it to clean our toothbrushes!
LED Lights
I use natural sunlight to grow my microgreens.
But that is not always possible.
The most commonly used artificial lights for microgreens are fluorescent (TL) tubes and LEDs.
I converted all the lights in my home to LEDs last year.
I shaved more than 60% off my light bill.
When growing microgreens, it is vital that you use a blue spectrum light instead of red.
But these lights can be expensive.
Barrina Plant Grow Lights (available on Amazon) is perfect.
Don’t mistake daylight and full spectrum as the same kind of light.
Daylight refers to the color temperature.
A full-spectrum bulb represents the entire visible light spectrum, which is the same as the sun.
The Barrina Grow Lights can go closer to the microgreens and work great with the SOLIGT trays.
Timer
You should have your lights on for about 14-16 hours a day to promote the maximum growth of your microgreens.
It’s best to connect your lights to a 24-hour timer, so you don’t have to worry about turning them on and off every day.
The BN-LINK 24 Hour Plug-in Mechanical Timer (click to see it on Amazon) is my timer.

Easy to use, the built-in pin dial allows me to set my timer by pressing the toggle pins down for ON or keeping them up for OFF.
There maximum rating of watts on the timer is 125VAC, 60 Hz, 1875W, 15A Tungsten & Resistive, 1/2HP.
Make sure you don’t go over this rating.
Combine the wattage of your lights and check if it is under the rated watts stated on the timer.
The last thing you want to develop is fire.
Mini Rake
You could always use your hands or gloves to even out your soil.
But why not a handy mini rake.
And the KiiZYS 12-Piece Small Garden Tools Set (click to see it on Amazon) comes with a neat mini rake just for that purpose.
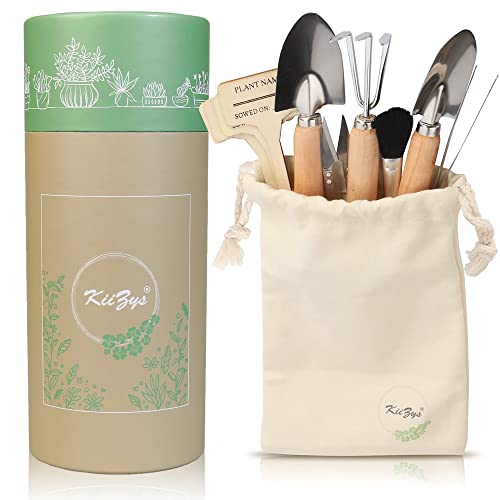
Less than 10” long, they are made of heavy-duty cast aluminum.
They are durable, not easy to rust or break.
It works great for loosening am spreading the soil evenly in your containers.
You will have an even bed to sprinkle your microgreens seeds.
Small Fan
You will also want to have a fan blowing near your growing space.
This helps the air to move around.
The young plants get the fresh air that they need to grow strong stems and prevent mold.
NexAir 7″ Air Circulator Portable Turbo Fan (available on Amazon) is small (5.2-inch frame) and inexpensive.

The small motor is long-lasting and quiet.
It has two speeds, and you can change the direction of the breeze with a 360-degree up-and-down adjustment.
The wave-shaped base with a rubber bottom makes the fan more stable and prevents vibrations.
It can work on the desktop or countertop.
Don’t blow the air directly on the microgreens.
This will cause the soil to dry too quickly.
But only use the OPOLOR fan if you have a humidity or non-circulating air problem.
Temperature and Humidity Meter
Another must-have item is a temperature and humidity meter.
It would be best if you had the correct values to grow your microgreens and prevent mold.
Inkbird IBS-TH1 Meter (available on Amazon) is my choice.

But again, only use this if you think you have a humidity problem.
Or if you are growing on a larger scale in a basement, for instance.
The temperature and humidity are displayed on the screen with a temperature range of 40~140°F/-40~60°C and a humidity range of 0~99%RH.
There is a free APP (Engbird) that also supports multi-language.
Great if you’re really into growing microgreens as a business.
Humidity Dome
If you can’t get your humidity up to 40-50%, you can use a humidity dome to keep the moisture.
Living Whole Foods Plant Tray Clear Plastic Humidity Domes (on Amazon.com) is excellent if you are starting.

The humidity-control dome lid keeps the microgreens seedlings moist.
The dome also minimizes water evaporation.
If you spray paint them black, you can also use them as a blackout or germination dome.
Spice Shaker
Some people have magic hands and can evenly distribute their seeds with just one cup.
Unfortunately, you may need a seed shaker to distribute the seeds evenly if you are not so gifted.
The Winco PDG shaker (click to see it on Amazon) solves your problem.

Made of clear plastic with holes large enough to dispense most microgreens seeds.
This way, you can have an even spread of seeds.
Frequntly Asked Questions
How do I start growing microgreens and incorporating their health benefits into my nutrition?
I’ve learned a lot about microgreens, how to grow them, how good they are for you, and what you can do with them.
Check out my guide, “The Beginner’s Nutritional Guide to Incredible Microgreens.”


